One desk for the whole show
Live Event Grafix puts lower thirds, titles, media, timers, slides and an ATEM switcher on one control surface, with fill, key and utility outputs ready for your vision mixer. This manual walks the operator through every page, what each control does, and how a show day runs.
Everything on one screen
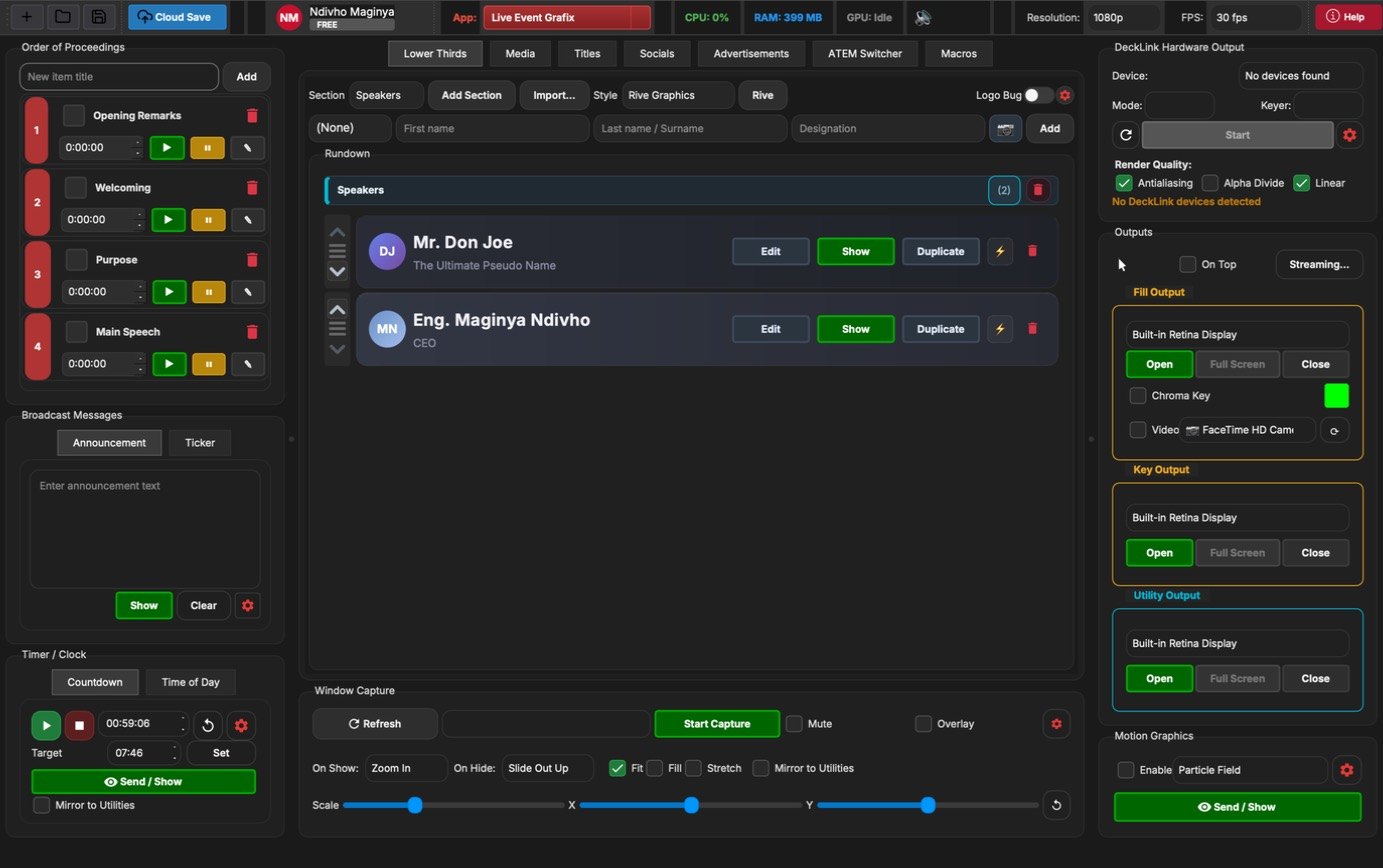
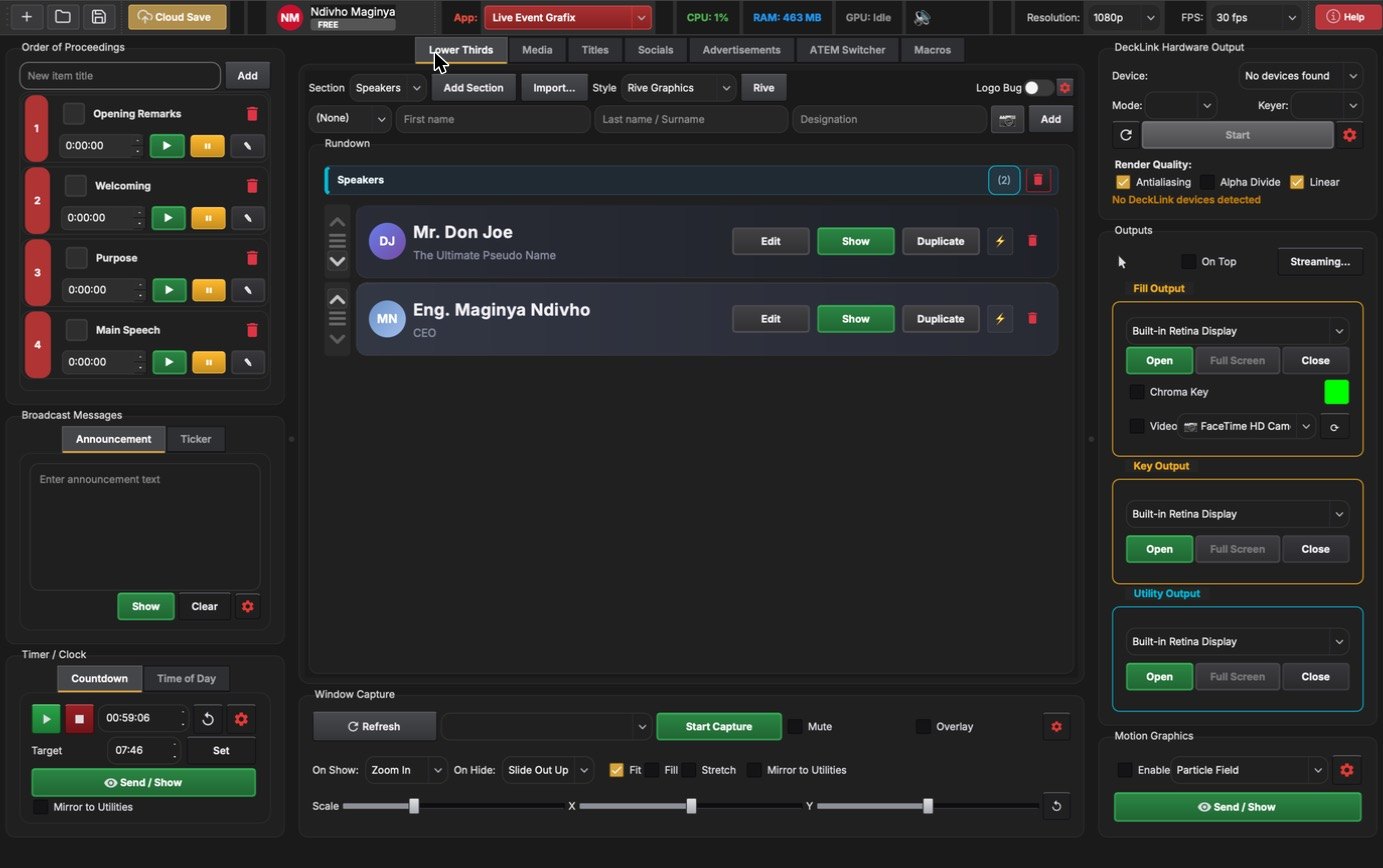
The main window is split into three columns. The left column holds what keeps the event on time, the centre holds the graphics you build and trigger, and the right column holds where the pictures go. Select a number to see where it is.
Prepare the event before doors open
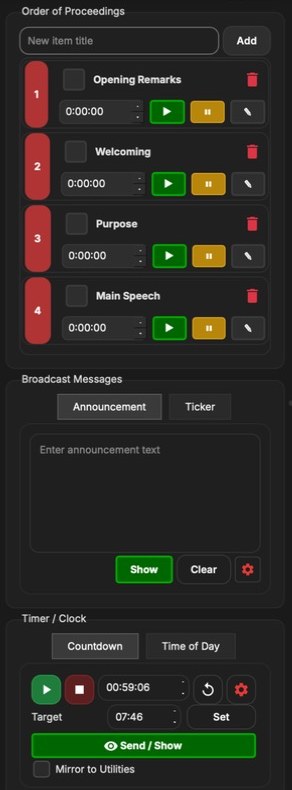
A project holds the whole event: speakers, running order, media, titles and settings. It saves on its own as you work, and Cloud Save keeps a copy in your account so another computer can open it.
The Order of Proceedings is the running order. Each item has its own clock, so you can see when a speaker is running over.
Start a blank project. ⌘N
Open a saved project. Recent projects are under File ▸ Recent Projects. ⌘O
Save now. Auto-save also runs in the background. ⌘S
Upload the project to your account.
Type an item title and add it to the running order. Tick the box when it is done.
Start the item's clock. ❚❚ pauses it, the pencil edits title and allocated time.
Broadcast Messages: put an announcement or a ticker on air. Clear takes it off; the gear sets its style.
Timer / Clock: show a countdown to a target time or the time of day. Mirror to Utilities also shows it on the stage monitor.
Names and titles, one key away
Every person who speaks gets a card in the Rundown. Cards are grouped in sections (Speakers, Panel, Guests…), and each card can go on air with one press. Choose from more than a hundred animated styles or a Rive design, and set position, colours and fonts in the style settings.
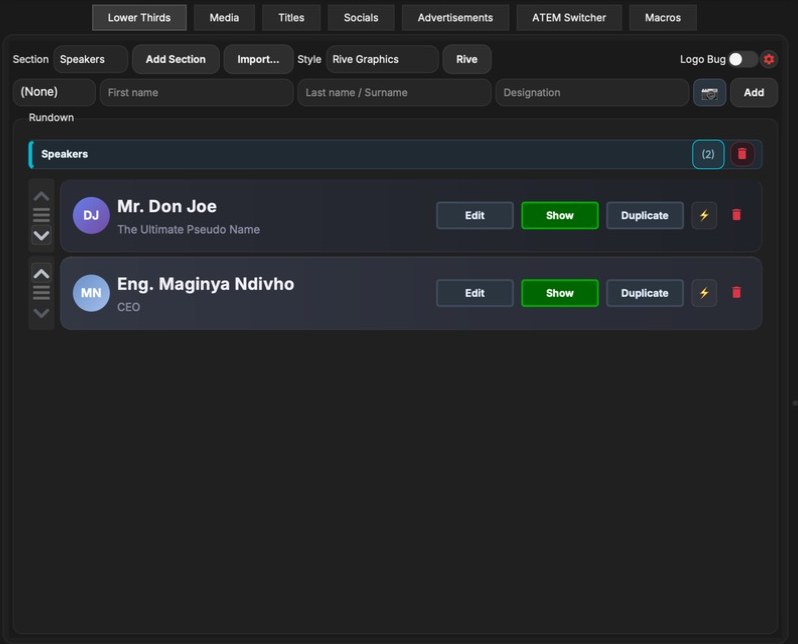
Pick an honorific, type first name, surname and designation, then Add to create a card in the current section.
Make a new group, such as a panel or a day of the event.
Bring in a whole programme from a Word, PDF, PowerPoint or Excel file. See chapter 04.
Choose the graphic: built-in animated styles or Rive designs.
Put this person on air. The key turns red while it is on air; press again to take it off.
Change the name, title or photo on the card.
Copy a card, handy for a second appearance with a different role.
Quick trigger: show the card now with its own settings.
Switch the corner logo on or off; the gear beside it sets image, corner and animation.
Drop in the programme, get every name
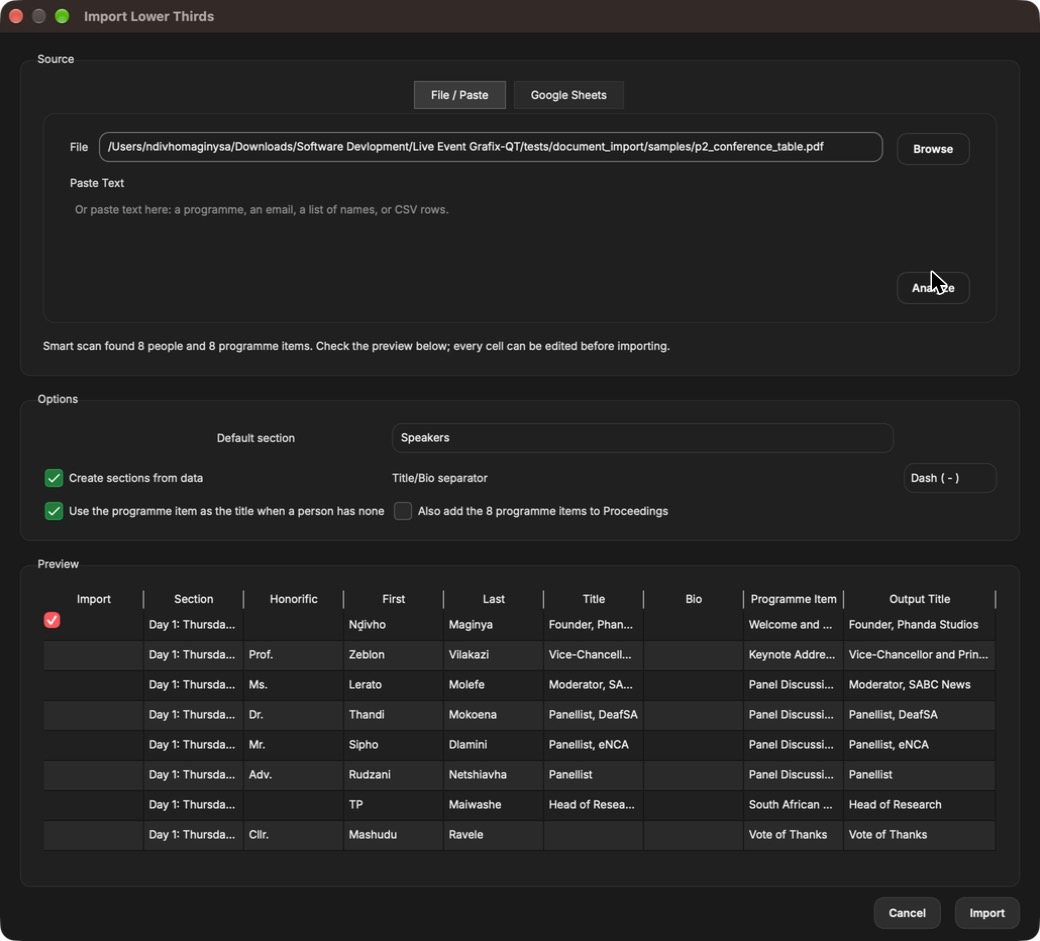
Programmes rarely arrive as tidy spreadsheets. Drop the file you were sent, or paste text from an email, and the smart scan finds each person's honorific, first name, surname and title, plus the programme item and session they appear under.
In this example a two-day conference PDF produced eight speakers in one pass, from "Prof. Zeblon Vilakazi, Vice-Chancellor" to "Cllr. Mashudu Ravele, Vote of Thanks".
Choose a Word, PDF, PowerPoint, Excel or text file, or drop it on the window.
Read the file or the pasted text and fill the preview.
Every cell can be edited. Untick a row to leave that person out; doubtful rows start unticked.
Make sections from the document's days or sessions, use the programme item as the title when a person has none, and add the items to the Order of Proceedings.
Create all the cards at once.
Google Sheets: the second tab of the same window imports from a shared sheet, with a column mapping when the sheet has headers.
Videos, stills and stingers
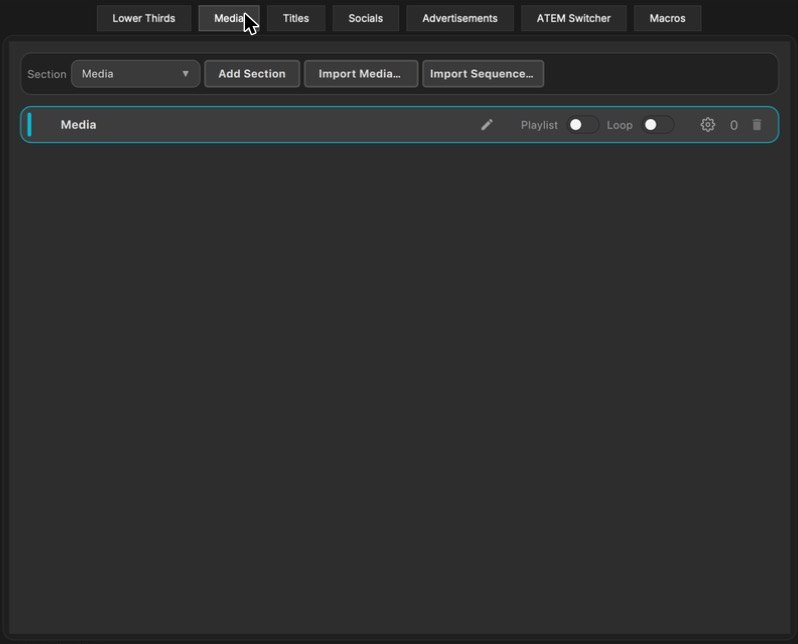
Play images, video and audio, numbered image sequences and video with transparency (ProRes 4444 and Animation) straight to the outputs, with fit, fill or stretch and a choice of transitions.
Add files to the current section.
Add a folder of numbered PNG, TGA or TIFF frames, alpha included.
Play the section's items one after another.
Start again when the last item ends.
Section settings: transitions, scaling and volume.
Seven tools for words on screen
The Titles tab gathers everything that is mostly text. Each tool has its own page; choose one below.
Sponsors on a schedule
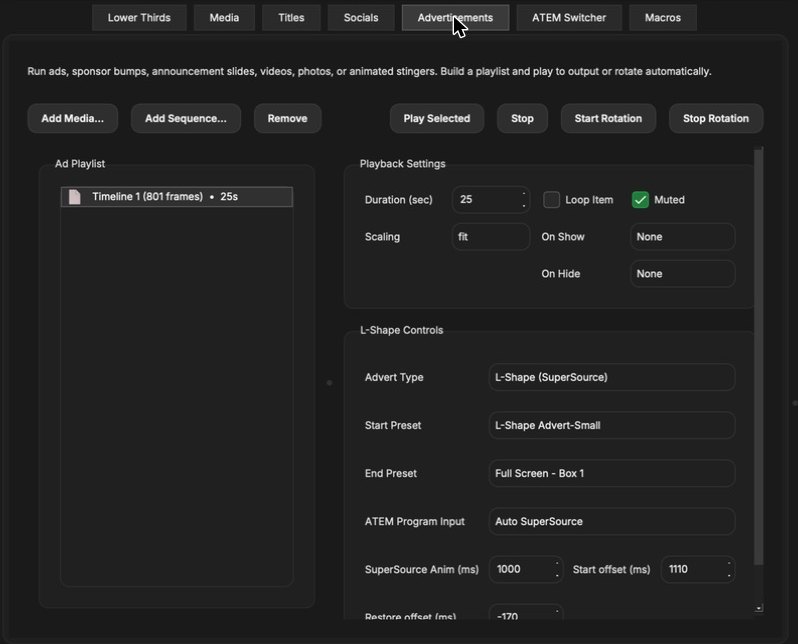
Add adverts, sponsor bumps, slides or stingers to the playlist.
Play one advert now. Stop ends it.
Cycle through the playlist on its own, each item for its Duration.
Per item: duration, loop, mute, scaling and show / hide transitions.
With an ATEM, squeeze the programme into a SuperSource box while the advert fills the L, then restore it when the advert ends.
Drive the vision mixer from here
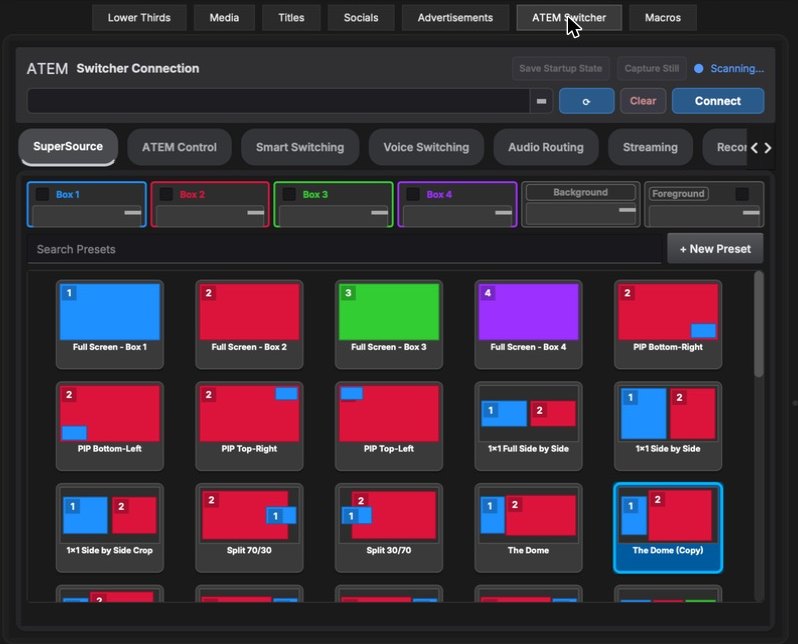
Find ATEM switchers on the network, or type its address.
Connect and read the switcher's inputs and state.
Turn each SuperSource box on and choose its source; Background and Foreground set the art layers.
One press lays out the boxes: full screen, PIP corners, side by side, splits and your own layouts.
Save the current box layout as a preset.
ATEM Control, Smart Switching, Voice Switching, Audio Routing, Streaming, Recording, Media and Audio Inputs.
Many steps, one press
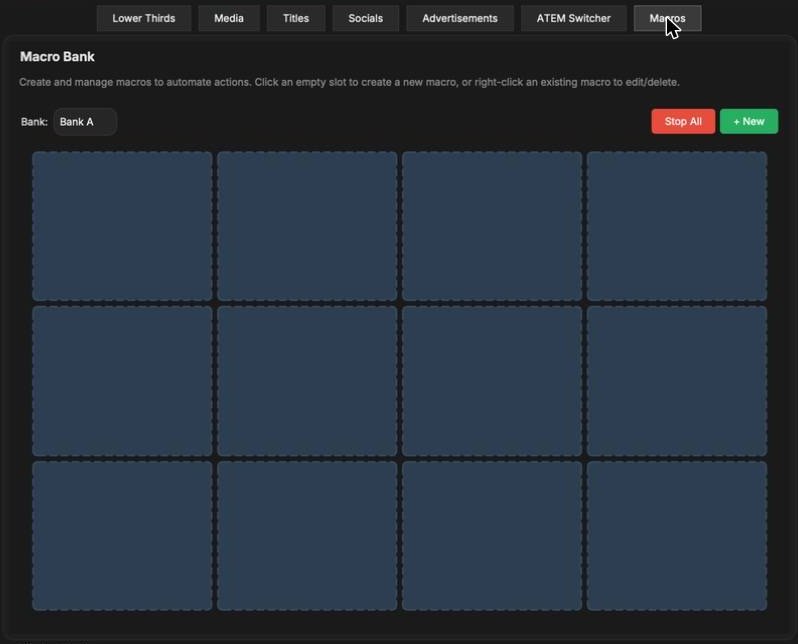
A macro records a sequence of actions, such as showing a speaker, starting their clock and switching the ATEM, and plays it back from one slot.
Switch between banks of twelve slots.
Create a macro, or click an empty slot.
Run the macro. Right-click a slot to edit or delete it.
Stop every running macro at once.
Run the slides, hand the clicker to a phone
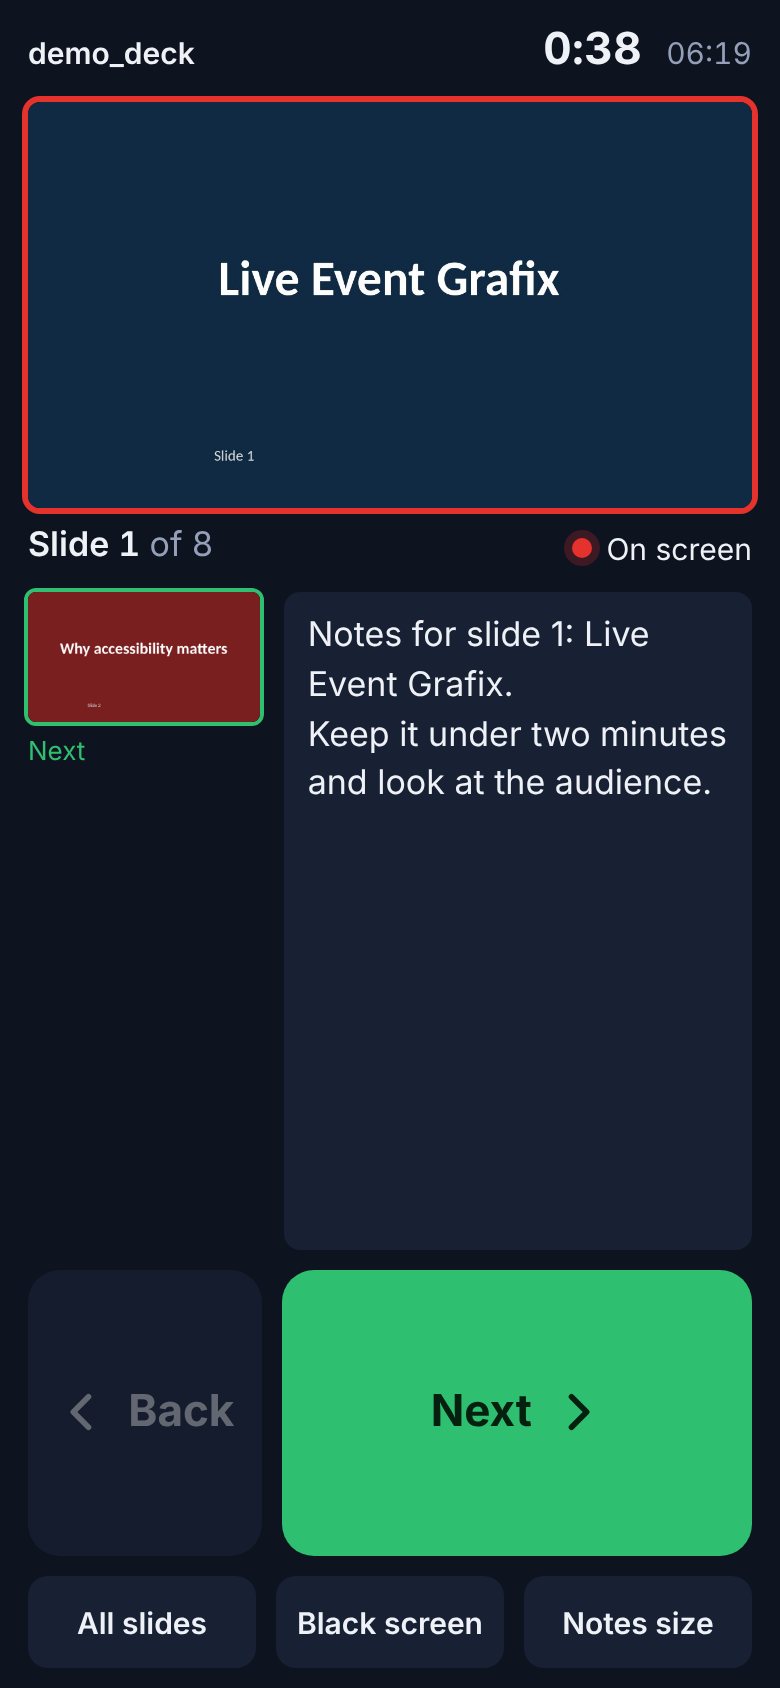
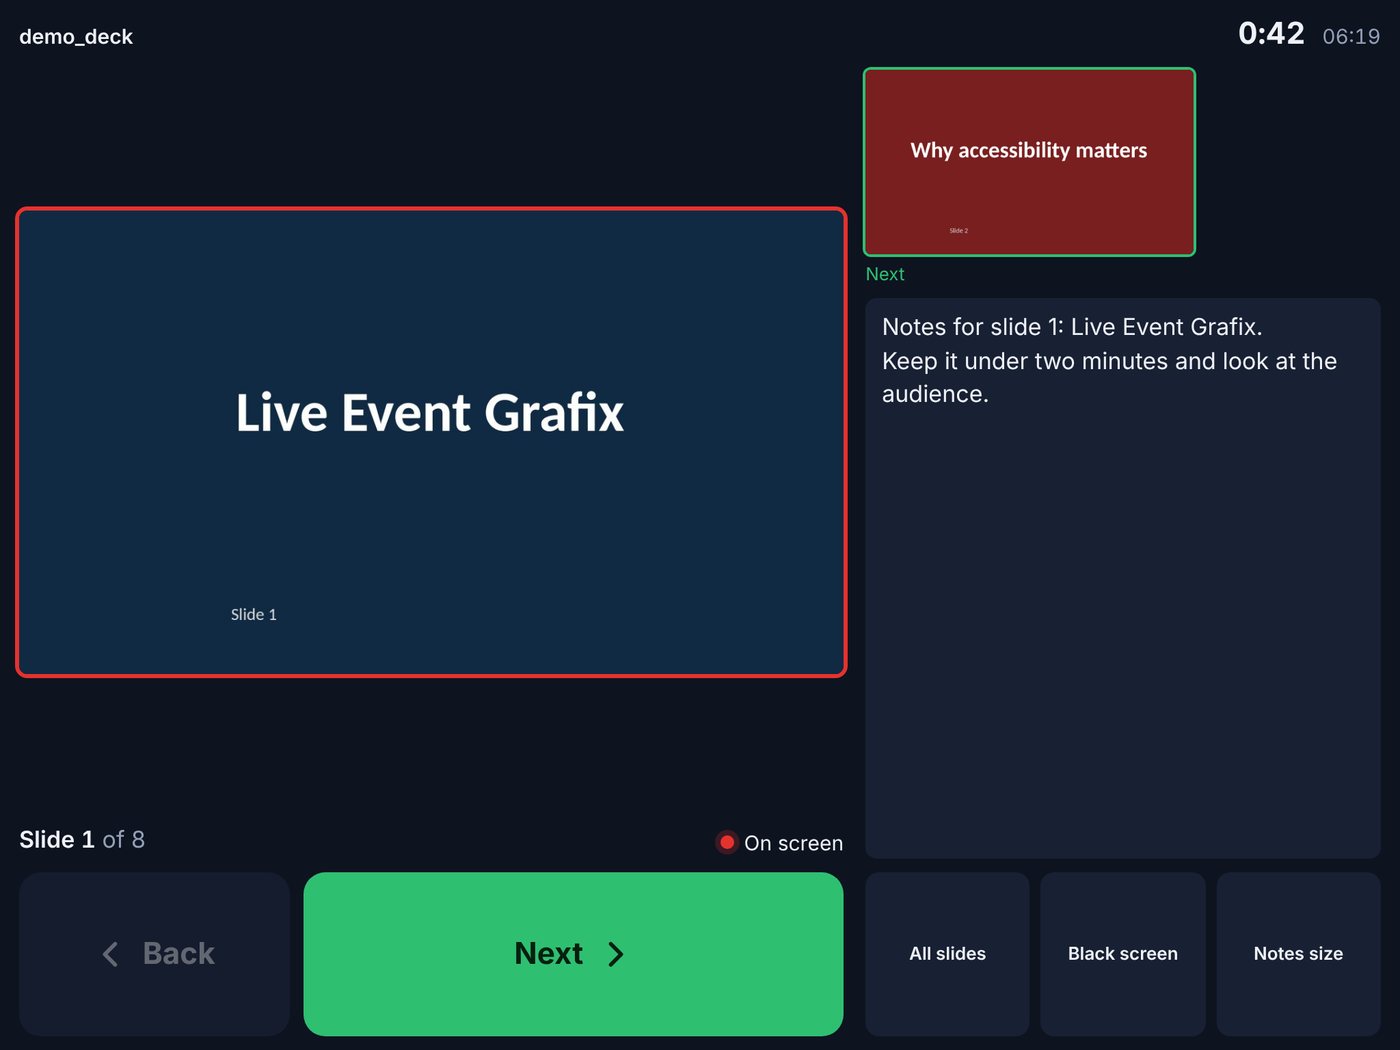
Open a PDF, PowerPoint or Keynote file under Graphics ▸ Presentation…. The operator sees the current slide, the next slide and the speaker notes. The presenter scans the QR code and gets Next and Back, the next slide, their notes and a timer on their own phone or tablet.
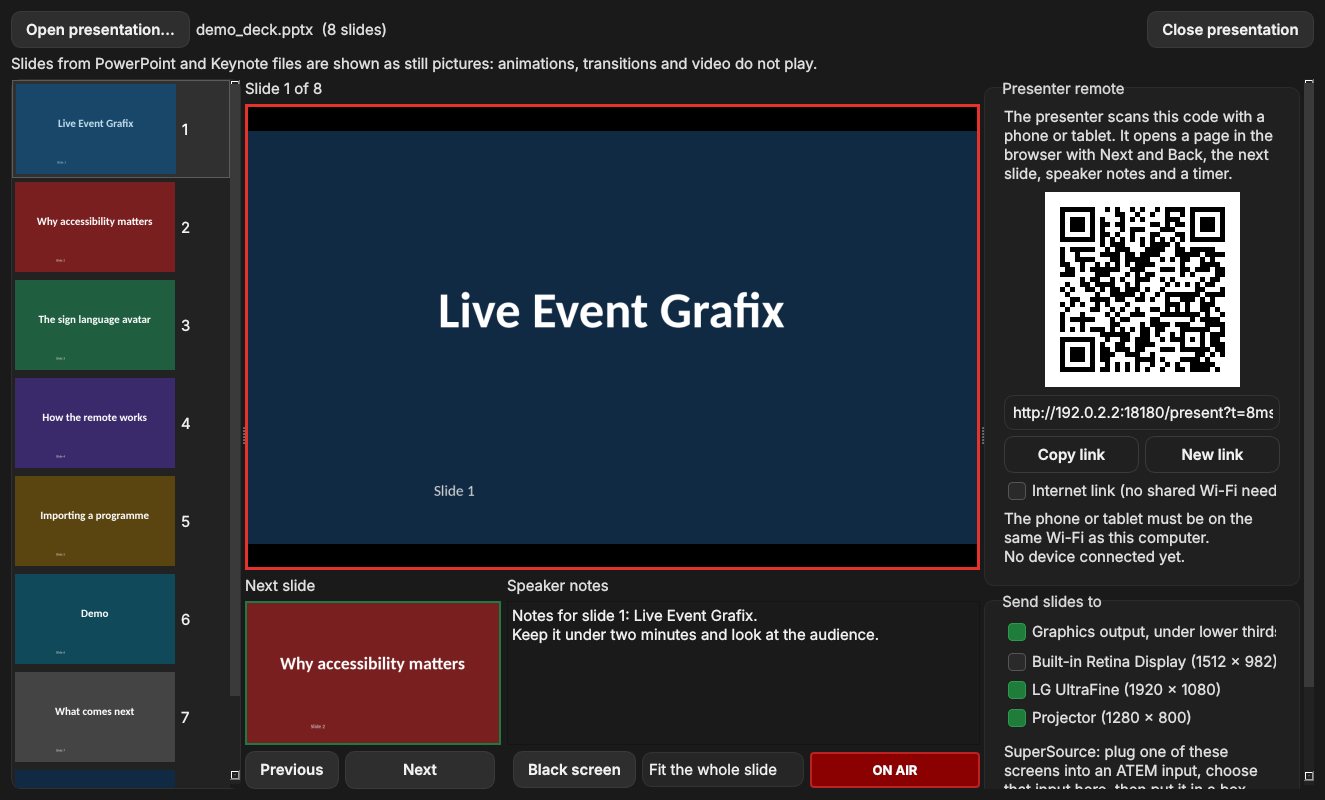
Put the slides on the graphics output, under the lower thirds.
Change slide here or from the presenter's phone.
Hide the slide without leaving the deck.
Fit the whole slide, or fill the frame.
Lets a presenter connect over mobile data, without joining your Wi-Fi.
Show the slides full screen on any connected screen or projector, as many as you like at once.
Plug a screen output into an ATEM input, choose that input, and put the slides in SuperSource box 1–4.
PowerPoint and Keynote slides are shown as still pictures, so animations, transitions and embedded video do not play. Export video as a media item instead.
Where the pictures go
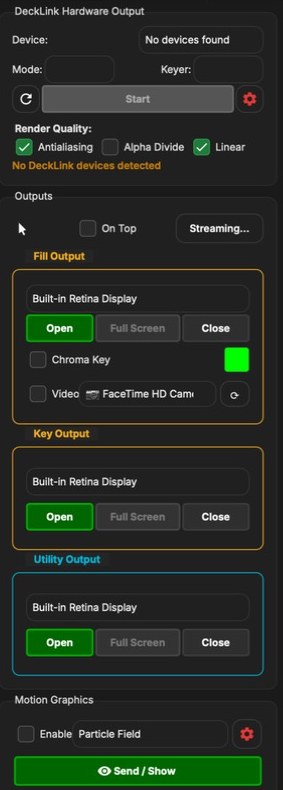
Fill carries the full-colour graphics and Key carries the matching black-and-white matte, so a vision mixer can key them over your cameras. Utility is the stage or confidence monitor for lyrics, running order and messages.
Open the output on the chosen display. Full Screen fills it; Close ends it.
Put the fill on a green (or any) colour for software keying.
Put the graphics over a camera or capture input.
Keep the output windows above other apps.
Send fill and key over SDI from a Blackmagic DeckLink card: choose device, mode and keyer, then Start.
Antialiasing, alpha divide and linear filtering for clean edges on the key.
Stream the program output over RTMP / SRT, or share it as NDI or Syphon. See chapter 13.
Motion Graphics: an animated background such as Particle Field behind the graphics.

Window Capture puts another app's window on air (a browser, a scoreboard, a video call), with its own transitions, framing and position.
Stay live while the show changes
Open Streaming… in the Outputs panel. One RTMP or SRT stream (or several) carries the program picture with the app's sound: media, lyrics and on-air remote guests are mixed together. Playing or stopping media never restarts the encoder, so the server never sees a gap.
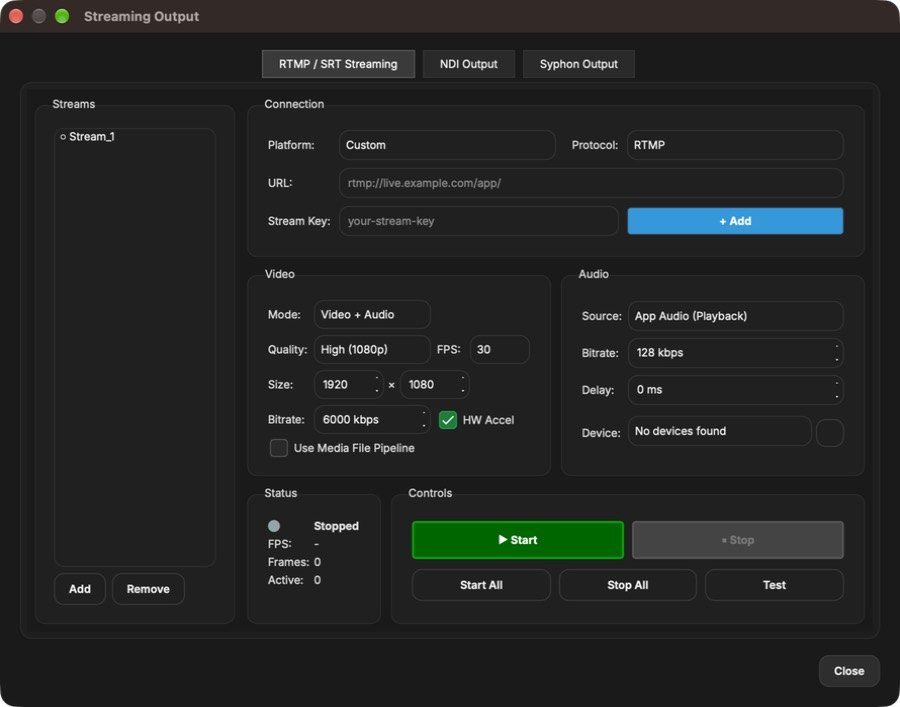
Start the selected stream. Start All starts every stream in the list.
If the internet or the server drops, the stream retries by itself (after 1, 2, 4, 8, then every 15 seconds) and says Connection restored when it is back.
For SRT the stream key becomes the streamid; packets are sized for SRT automatically.
Shares the program with its alpha channel on the network at a steady frame rate (30 or 29.97 exact), for vMix, OBS, TriCaster or another copy of the app.
Shares the program with other Mac apps (Resolume, MadMapper, OBS) without a cable.
Tip. If the stream status turns amber, look at the error line: “ffmpeg not found” means FFmpeg is not installed (brew install ffmpeg on a Mac).
Bring a replay in, send it out with its key
Graphics ▸ Replay / Live Input (NDI, Blackmagic)… receives a picture with transparency from another system (a replay server, DaVinci Resolve, vMix, OBS) and puts it on the Fill and Key outputs, so the ATEM's keyer can lay it over the cameras.
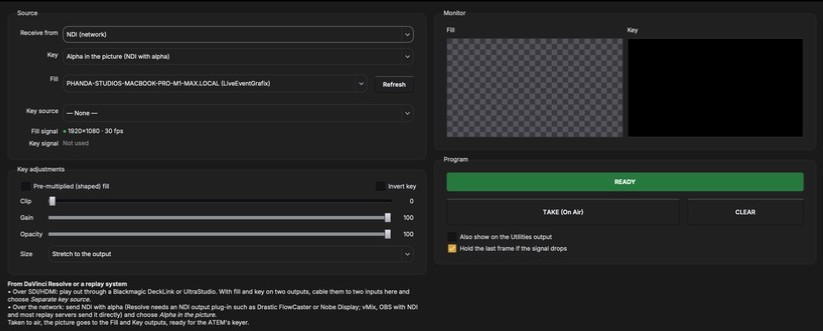
NDI over the network, or a Blackmagic input (DeckLink or UltraStudio, SDI or HDMI). The input format is detected by itself.
Alpha in the picture for NDI with alpha · Separate key source for fill and key on two inputs · No key for a full-frame picture.
Pre-multiplied (shaped) fill, invert, clip, gain and opacity, like a hardware keyer. Size: stretch, fit or fill.
Puts the input on the Fill and Key outputs. CLEAR takes it off.
If the signal drops, keep the last picture (on) or clear until it returns (off). The tally shows no signal either way.
From DaVinci Resolve. Resolve has no NDI output of its own. Either play out through a Blackmagic DeckLink or UltraStudio and cable it into this computer's Blackmagic input, or add an NDI output plug-in (Drastic FlowCaster, Nobe Display) and choose Alpha in the picture.
Guests from anywhere, without Zoom or Teams
Graphics ▸ Remote Guests… invites people by link. They open it in Chrome, Edge, Safari or Firefox on a computer or phone (no account, no app), see the programme, and their camera and voice arrive here ready to put on air. It runs on VDO.Ninja: open source, peer-to-peer and encrypted.
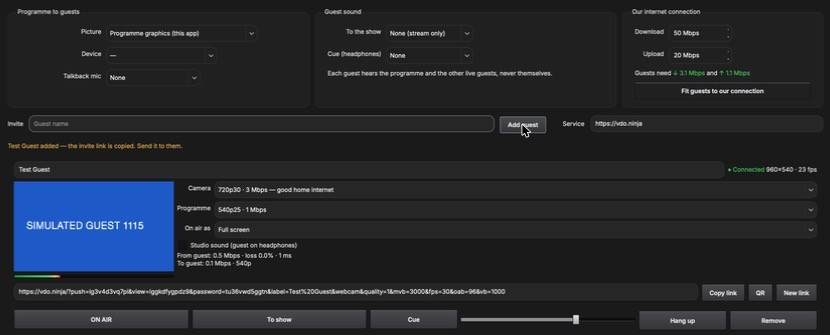
Makes a private link to the Live Event Grafix guest page and copies it. QR shows it for a phone; New link replaces it (the old one stops working). Direct link copies the plain VDO.Ninja link instead.
Guest's picture on the Fill and Key outputs: full screen, half screen or a box in a corner.
Guest's voice to the show: the audio output you pick (cable it to the ATEM) and the stream.
Listen on your headphones before the guest goes live.
The quality we ask from this guest: 1080p 6 Mbps down to 360p 400 kbps for a weak connection.
The return feed this guest gets: 1080p down to sound only. Each guest hears the show and the other live guests, never themselves.
Enter our download and upload speed. The window adds up what the guests need; Fit guests to our connection lowers the largest streams until it fits.
Send the app's programme graphics, a capture device (an ATEM's USB output shows the full programme), or an NDI source.
Talk to a guest privately
Under Programme & talkback to guests choose a Talkback mic and its channel, for example one channel of a RØDECaster. Under Guest sound each output has its own channel pair, so Cue can go to a line you only hear in your headphones. Talkback never reaches the stream, the show output or the other guests.
Talk to this guest only. Tap to latch it on, or hold it and it switches off when you let go.
Talk to every connected guest at once.
The Programme under talk slider: how loud the programme stays for that guest while you talk (30% by default), so they hear you clearly.
Type a short message; it appears on the guest's page, e.g. “You're on in 2 minutes”.
The guest page
The link opens a light Live Event Grafix page. The guest checks their name, camera, microphone and speaker, and clicks Join the studio. Everything else is set from here: quality, what they see and hear, and when they are on air. They see the programme, an On air light, a notice when you are talking to them, and five keys.
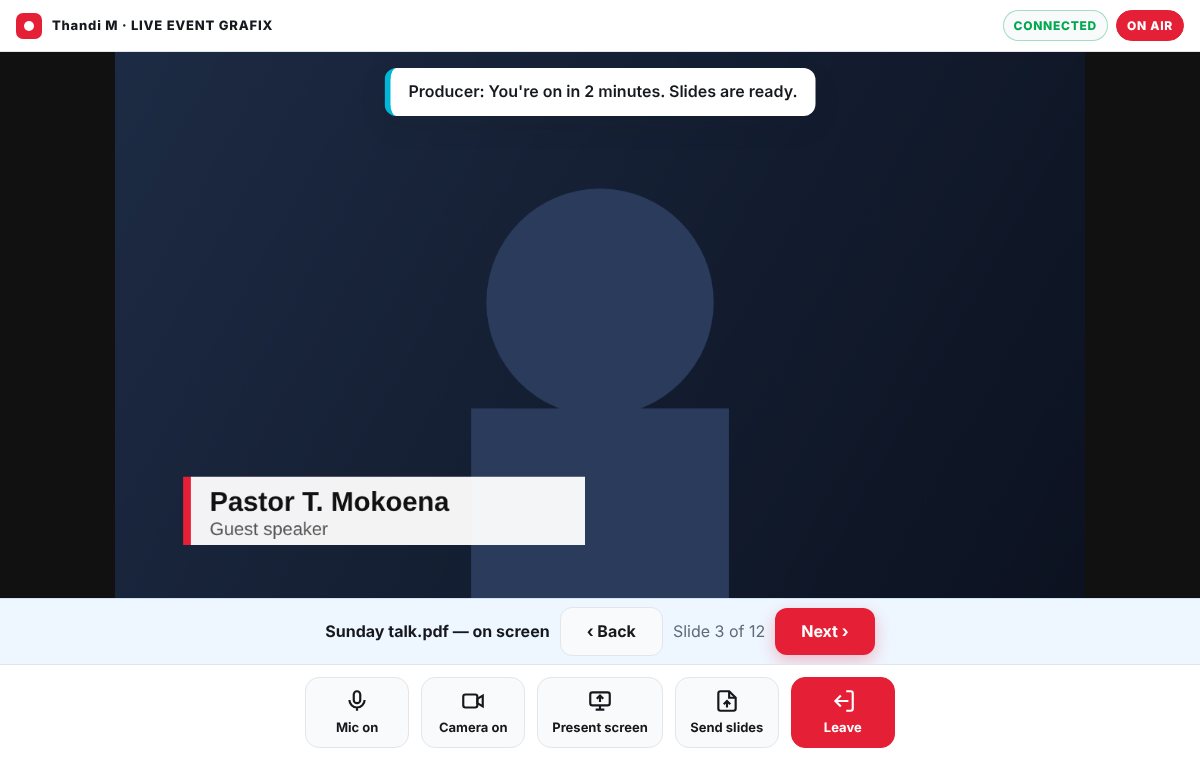
The guest can switch them off. You can mute their mic from the card too.
On a computer, shares a window or the whole screen. It arrives as a second picture on their card; you choose when it goes on air.
Sends a PDF, PowerPoint or Keynote file (up to 300 MB) to this computer. The card shows it; Open slides loads it into the Presentation window.
While their slides are showing, the guest gets Back and Next (or the arrow keys) that move your presentation.
Shared screens
Puts the guest's shared screen on the Fill and Key outputs. It is always shown whole, never cropped, and the guest's camera stays on top of it.
Full screen, left or right half, or a box, so you can build a SuperSource-style layout of screen and camera.
For the best result ask guests to wear headphones (then tick Studio sound), sit facing a window or a lamp, and use a wired or strong Wi-Fi connection. The statistics line under each guest warns when their connection struggles; lower their Camera setting and it takes effect straight away.
Every gear opens a style
The gear key next to a feature opens its settings: a list of looks on the left, a live preview, and colours, size and position on the right. Changes show in the preview straight away and reach the output when you press OK.
Build your own graphics, sign every word
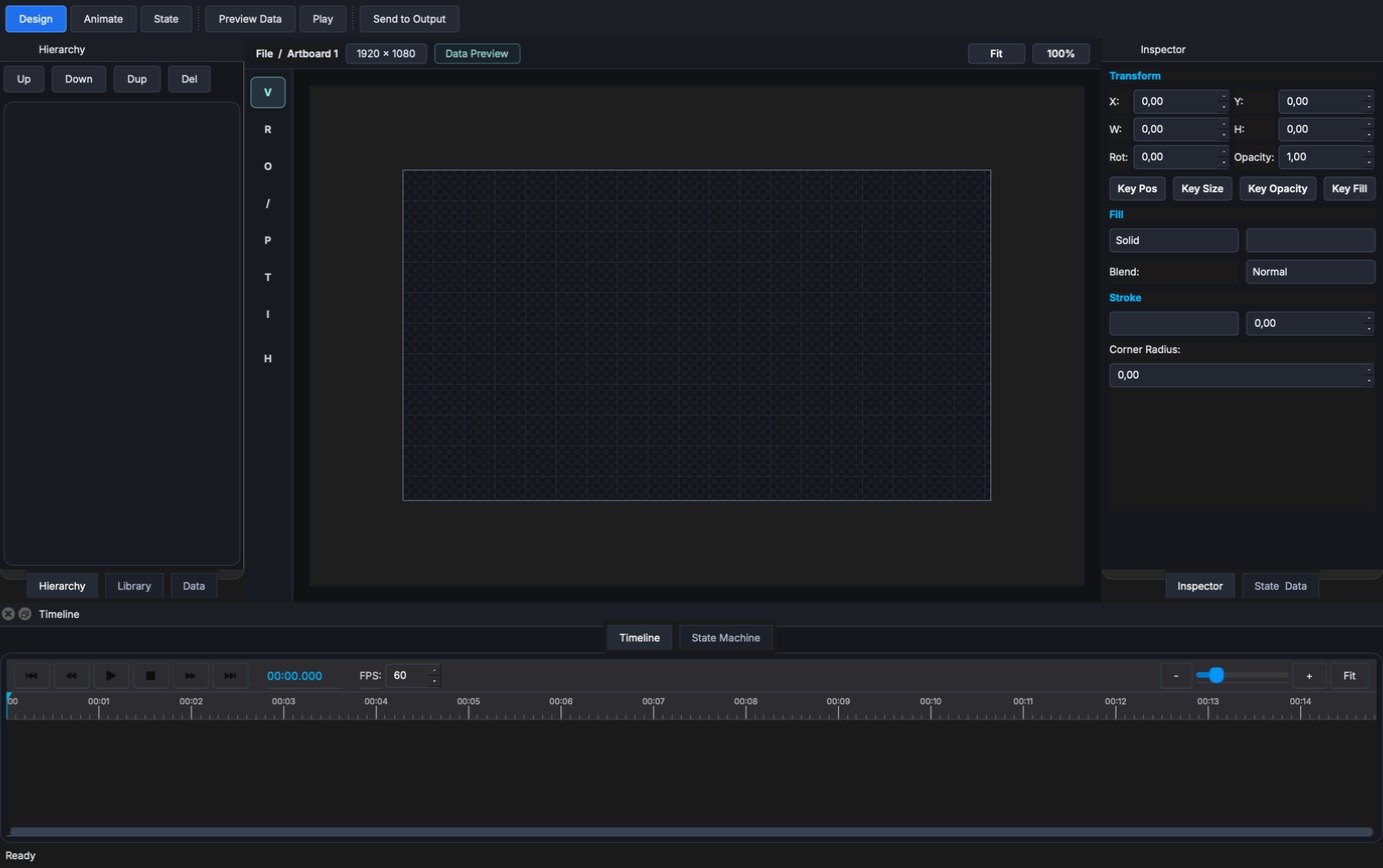
Graphics Designer is a full layout and animation tool for your own lower thirds, bugs and full-screen graphics. Draw on a 1920 × 1080 artboard, key position, size, opacity and fill on the timeline, link text to live data, and send the result to the output.
Draw rectangles, ellipses, lines, paths, text and images (the V R O / P T I H tools).
Set keys for position, size, opacity and fill on the timeline.
Build a state machine so the graphic reacts to show, hide and data changes.
Put the design on air; File ▸ Export to Main App keeps it in the project.
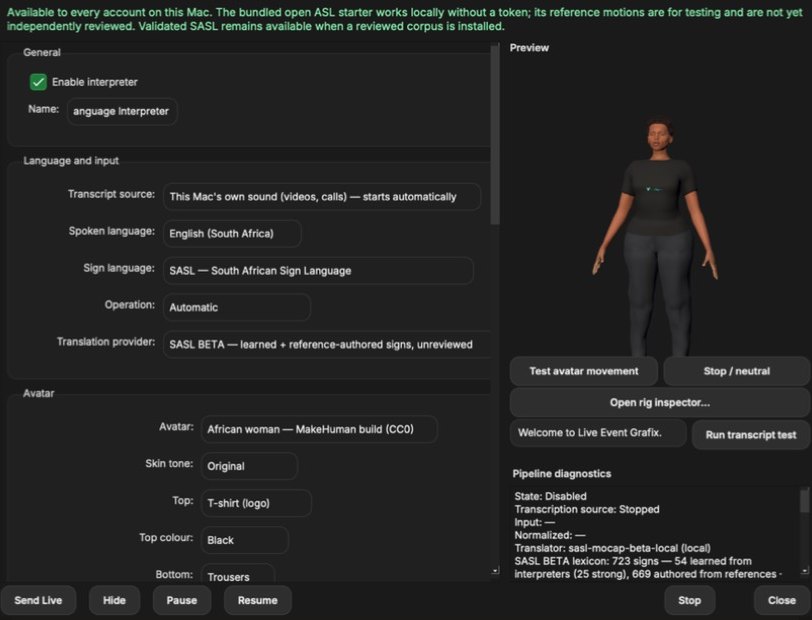
The Sign Language Interpreter listens to the programme sound, turns speech into text and signs it with a 3D avatar on the output, in South African Sign Language or ASL.
Listen to this Mac's own sound, a microphone or the live captions.
Choose the interpreter, skin tone and clothing.
Test avatar movement and Run transcript test check the signing before the show.
Put the interpreter on air; Hide, Pause and Resume while it runs.
Beta: the bundled sign vocabulary is for testing and has not been independently reviewed. Use a reviewed corpus for public broadcasts.
Standard or Control Room
Choose the look under View ▸ Theme. Control Room keeps the panels and colours you know and changes the keys to square, backlit caps that light up when active, like a hardware switcher panel. Drag across the picture to compare.
From doors to wrap
- Open the project and check the running order
Every item has a title and allocated time. Import late changes from the latest programme document.
- Open the outputs
Fill and Key on the displays or DeckLink feeding the mixer, Utility on the stage monitor. Turn on On Top.
- Connect the ATEM
Scan, connect, and press a SuperSource preset to confirm the boxes.
- Test a lower third on air
Show and clear one card. Check the key edges on the mixer's preview.
- Call the remote guests
Send the links, check each picture and Cue their sound. Fit the guests to our connection, and start the stream so reconnection is armed.
- Load the presentation and pair the remote
The presenter scans the QR code. Use the internet link if their phone is not on your Wi-Fi.
- Set the countdown
Target the start time, Send / Show, and mirror it to the Utility monitor.
- Go
Start the first item's clock and work down the Order of Proceedings.
Put the audience on screen
Sign in to YouTube, Facebook, Instagram or TikTok, pick the live stream, and comments arrive here as they are posted. Choose one and show it as a styled graphic.
Choose which of your streams to read comments from.
Search comments, or show only Members or Super Chats.
Keep the list refreshing on its own.
Put the selected comment on air. Mirror to Utilities shows it on the stage monitor too.